Exercise 1 Getting Started with Arduino
Objective: Install Arduino and Teensyduino
To turn in: Nothing! Make sure your software is installed and working so you’re ready for the next class period.
Introduction
Arduino is an open-source platform for developing interactive electronic devices. More specifically, Arduinos are microcontrollers, which are essentially small computers that can be programmed to perform a specific task over and over again. Microcontrollers are ubiquitous in the modern world and are embedded in scientific equipment, cars, cell phones, and nearly every other electronic device. Arduino provides a simple, standardized interface for microcontrollers, which has led it to become a very popular tool for hobby projects, citizen science tools, and even art installations. Arduino began in 2005 as a student project at the Interaction Design Institute Ivrea in Ivrea, Italy.
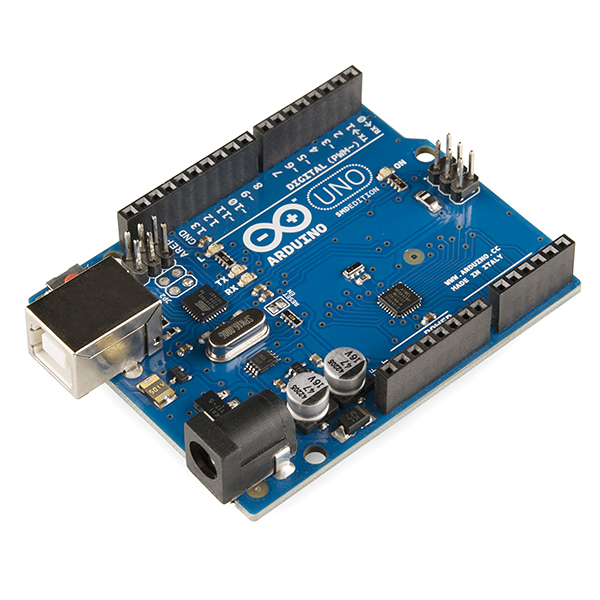
An Arduino Uno. This class will use a variant of the Arduino, called the Teensy, as described below. (image credit: Spark Fun, CC BY 2.0)
Using an Arduino requires a program, or a set of commands that are uploaded to the Arduino to have it perform the desired task. In the Arduino community, the term sketch is used synonymously with program. Examples of possible programs include having the Arduino measure things like temperature, light, or humidity, or control things like lights or motors. You could even have it measure the temperature and turn on a heater when it gets too cold. Although an Arduino can run as a stand-alone device once setup, it must first be programmed by a computer.
To program the Arduino, we’ll use the a piece of software called an integrated development environment (IDE) that’s available for free on the Arduino website. The IDE is shown in the figure below. At the top of the IDE is the menu bar, just like any other program. The middle part of the IDE is the “text area”, and looks like a text editor or simple word processing program. The text area is where you write the code. Finally, the black bottom region of the editor is the message area; this is the area where important messages detailing errors and successes will be displayed. Arduino code is written in the programming language C – probably the most commonly used language in the world – but the IDE handles some of the programming behind the scenes to make it easier for the user.

Arduino IDE showing an example program (image credit: Cedar101 [CC0], wikimedia.org)
![Cedar101 [CC0], wikimedia.org](https://commons.wikimedia.org/wiki/File:Arduino_IDE_-_Blink.png)
Part of the beauty of Arduino is its open-source nature. Many spin-offs and flavors of Arduino exist due to it’s open-source nature, each with its own unique benefits. In this class, we’ll use a variant of Arduino called the Teensy (specifically Teensy 3.5). The Teensy is programmed in the same way as an Arduino, but has a smaller form-factor and more capabilities than a standard Arduino. The picture below shows a Teensy 3.5 and the functions of each connection on the Teensy. Seeing all the functions laid out like that can be overwhelming, but we’ll walk through the ones we need to use step-by-step in future exercises.
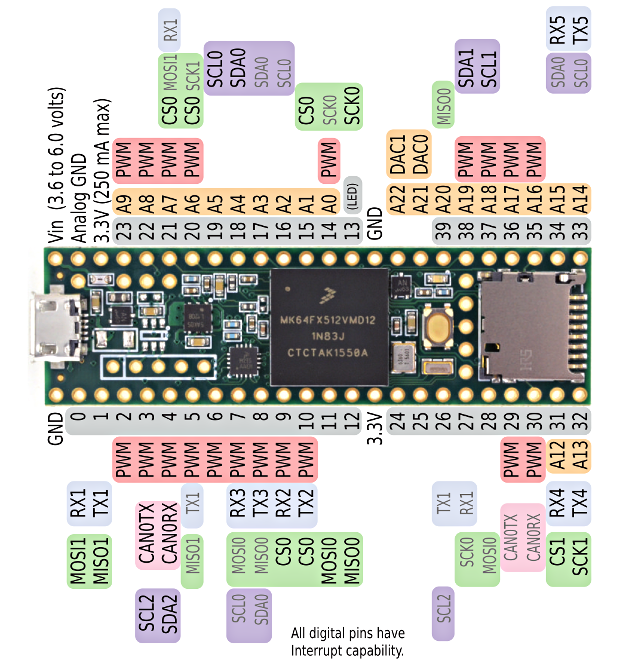
A Teensy Board, with the pin (connection) numbers and functionalities shown (reprinted from PJRC.com).
This exercise will walk you through installation of the Arduino IDE, the software for the Teensy (Teensyduino), and an initial check of the board.
1.1 Install the Arduino IDE
You MUST follow the order of the instructions here or Teensyduino will not work!
- Use a web browser to navigate to https://www.arduino.cc/en/Main/OldSoftwareReleases#previous.
- Download the installer for version 1.8.6. You must choose the installer appropriate for your operating system.
- Choose Just Download to download the software, or make a donation if you’re feeling generous!
- Open the file that downloads and run the installer.
- Open the Arduino program to make sure it runs and to prepare for the next steps.
1.2 Install Teensyduino
- Use a web browser to navigate to https://www.pjrc.com/teensy/td_download.html.
- Download the correct installer for your operatring system. Note that steps 1 and 2 on the Teensy page should have been completed when you installed the Arduino IDE, above.
- Run the installer. When prompted:
- Select the
Arduino/folder for the install location. If Next is greyed out you probably downloaded the wrong version of the Arduino IDE. - Select All when asked which additional libraries to install.
1.3 Test the Teensy!
1.3.1 Check the board
Plug your Teensy into the computer via the USB connection.
BE EXTREMELY CAREFUL WITH THE USB CONNECTION ON THE TEENSY. THEY BREAK VERY EASILY!!
You should see the orange light blinking on the Teensy. If you do not, something is wrong with your Teensy and you should notify your instructor.
1.3.2 Check the software
- Open the Arduino IDE.
- Click
Tools > Board > Teensy 3.5 - Click
File > Examples > 01.Basics > Blink. - Find the part in the program that says
delay(1000)and change it todelay(500). - Click Verify in the software (checkmark button in upper left corner).
- Press the white button on the top of the Teensy.
- Press upload in the software (right arrow button, next to checkmark).
- You should see the orange light blink more quickly. If you encountered any errors, something could be wrong with your software installation or you may have made a typo in the code. Notify your instructor of any problems.